Why your Christmas projector looks dim, and six fixes
A projector that looked bright in the product photos can look faint on your own wall. Most of the time the projector is fine and the setup is working against it. Six fixes cover nearly every case, and none of them costs anything.
Why a projector looks dim
A projector sends out a fixed amount of light, and your house decides how much of it reaches your eyes. Distance, surface and the light around it all count, often more than the projector itself.
Product photos are usually taken on a pale wall in full darkness, far from any streetlight. A dark brick house on a lit street is a much harder screen, so the same projector looks noticeably fainter.
Owners report this gap a lot. Brightness gets mixed reports for the Star Shower Ultra 9 and the YUEGANG, and some owners of the Govee H7073 say it falls short, while others praise all three.
What the coverage figures hide
Coverage is the area a listing says the pattern can fill. It is a measure of size, not brightness, and the bigger the area, the thinner the same light is spread.
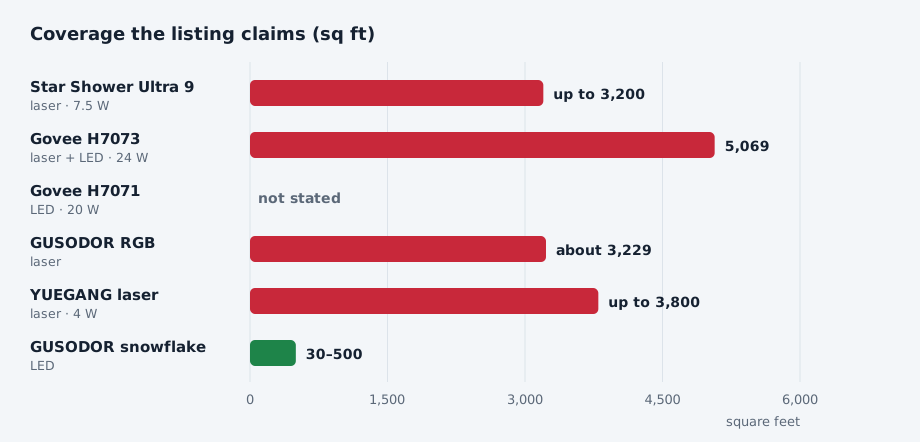
The figures range widely, from 30–500 sq ft for the GUSODOR snowflake to 5,069 sq ft at 33 ft for the Govee H7073. Star Shower claims up to 3,200 sq ft without a distance, and Govee gives no coverage at all for the H7071 snowflake projector.
Light follows the inverse-square idea. Double the distance and the picture grows to about four times the area, with about a quarter of the brightness on each square foot. The guide to projector distance has the figures for each model.
Lumens, watts and quiet listings
Lumens measure the visible light a source puts out. That would be the useful number to compare, yet none of the six listings we compare gives a lumen figure.
Watts are the closest clue, and a loose one. The listings give 4 W for the YUEGANG, 7.5 W for the Star Shower, 20 W for the H7071 and 24 W for the H7073, but a laser and an LED use their power in very different ways.
A laser turns its power into sharp dots that stay bright at any distance but cover only points. An LED picture fades evenly as it grows, which laser or LED explains in full.
Six fixes for a dim projector
Work through these in order, since the first three solve most cases. Give each one a full evening before moving on, because dusk and full dark look so different.
1. Move it closer
Closer means a smaller, brighter picture. If the pattern spills past the edges of your wall, the projector is too far away anyway, so move it in until it fills the front you care about and no more.
For an LED projector this matters most. Govee recommends about 10 ft from the wall for the H7071, and owners say its figures look bright up close but blur farther from the house.
2. Turn off competing light
A porch light, a garage light or a streetlight washing over the wall flattens the picture. Switch your own lights off while the projector runs, or put them on a timer that ends at dusk.
Where a streetlight is the problem, aim at the side of the house it doesn’t reach. A shaded gable often looks brighter than a larger front wall in full streetlight.
3. Aim at a lighter, plainer surface
Light, plain, flat surfaces return the most light. Dark brick, stained wood and trees swallow it, and owners of the H7071 say its colors show best on a light, plain wall.
If your front is dark, look for a white garage door, pale trim or a light fence. Snow on the lawn reflects well too, so a pattern aimed low across a snowy yard can outshine the same pattern on brick.
4. Focus and clean the lens
An LED projector with a focusing lens needs focusing for its distance, and a soft image reads as a dim one. Adjust it slowly at full dark while someone watches from the street.
Dust, pollen and dried rain spots scatter light on any lens or laser window. Wipe it with a soft, dry cloth while the projector is switched off, and never look into the aperture while it runs.
5. Wait for full dark
At dusk the sky still lights the wall, and any projector looks faint against it. The same pattern looks much stronger an hour later, once the sky has gone fully dark.
If your timer or sensor starts the show too early, move the start back. The placement tips also cover keeping a sensor clear of stray light, which makes the start time steadier.
6. Clear fog and condensation
On cold, humid nights a lens can fog inside or collect dew outside, and the whole picture turns hazy. Give a projector a short wait after switching on, and wipe outside moisture away once it has warmed.
Never wrap the projector in a plastic bag to keep it dry. A bag traps heat and moisture, which is bad for the picture and worse for the projector.
When the projector itself is the problem
If a projector stays dim after all six fixes, or dims further over a few nights, the unit may be failing. A laser that loses one color or an LED that flickers is a fault, and eight common faults covers the next steps.
Brands differ in how they back that up, from a 90-day warranty on the GUSODOR models to 12 months on the Govee H7073. The guide to Christmas projector brands compares warranties and support.
Choosing for brightness
For a large, light-colored front, a laser with wide coverage such as the Star Shower Ultra 9 or the Govee H7073 fills the most wall. For a smaller front, or one in streetlight, an LED projector set close gives a richer picture.
If you are still deciding which Christmas projector to buy, the comparison table lists coverage and distance for all six. The laser or LED section shows how each kind makes its picture.
If a bright picture close to the house matters
The Govee H7071 throws its LED patterns through a focusing lens from about 10 ft, where owners call it bright. It sits in the $$$ band, its figures blur when it stands farther back, and its discs are awkward to change.
